
The following is a pitch for a section of a level set in the Uncharted franchise, inspired by the Al-Hambra fortress in Granada Spain.
Level Pitch
Hot on the trail of a big find, Nathan Drake’s destination is Al-Hambra’s Alcazaba (fortress) in search of a vital clue. Unfortunately for him, his arch-nemesis Doctor UptoNoGood and his mercenaries are already on the scene! Now our plucky adventurer must contend with them in-order to reach his goal!

Objective
Traverse the layout to the indicated door, and defeat any enemies encountered along the way.
Characters
Main Character
Nathan Drake: The player is Nathan Drake.
Enemies
Mercenaries: Foreign mercenaries hired by Doctor UptoNoGood.
Please refer to the enemy design doc for behavior details.

Look and Feel
The layout is inspired by the Al-Hambra Alcazaba in Granada. Accordingly the look and feel should reflect as such.
The playable area should be derived from the Al-Hambra complex.


The layouts background should be a mix of the Spanish countryside and the city that surrounds the Alcazaba.


Weapons and Items
- The player is initially equipped with a pistol.
- All enemies are initially given AK-47’s, and body armour.
Dev Note: A fun mechanic here would be for the player to be able to loot enemies and take their equipment ammo/gun/armour.
Initial Paper Maps
Before blockout construction in Unreal I began with paper maps.


Map Top Down
Key

- Door A = Lower Fortress Door
- Door B = Main Fortress Hall Entrance
- Door C = Upper Fortress Wall Door
- Green Door = An Objective Door
- Red Door = A non-enterable door
- White = Wall
- Yellow = Climbable Ladder
- Grey = UsableCover/Vaultable (not into large drops)
- Light Blue = Traversable
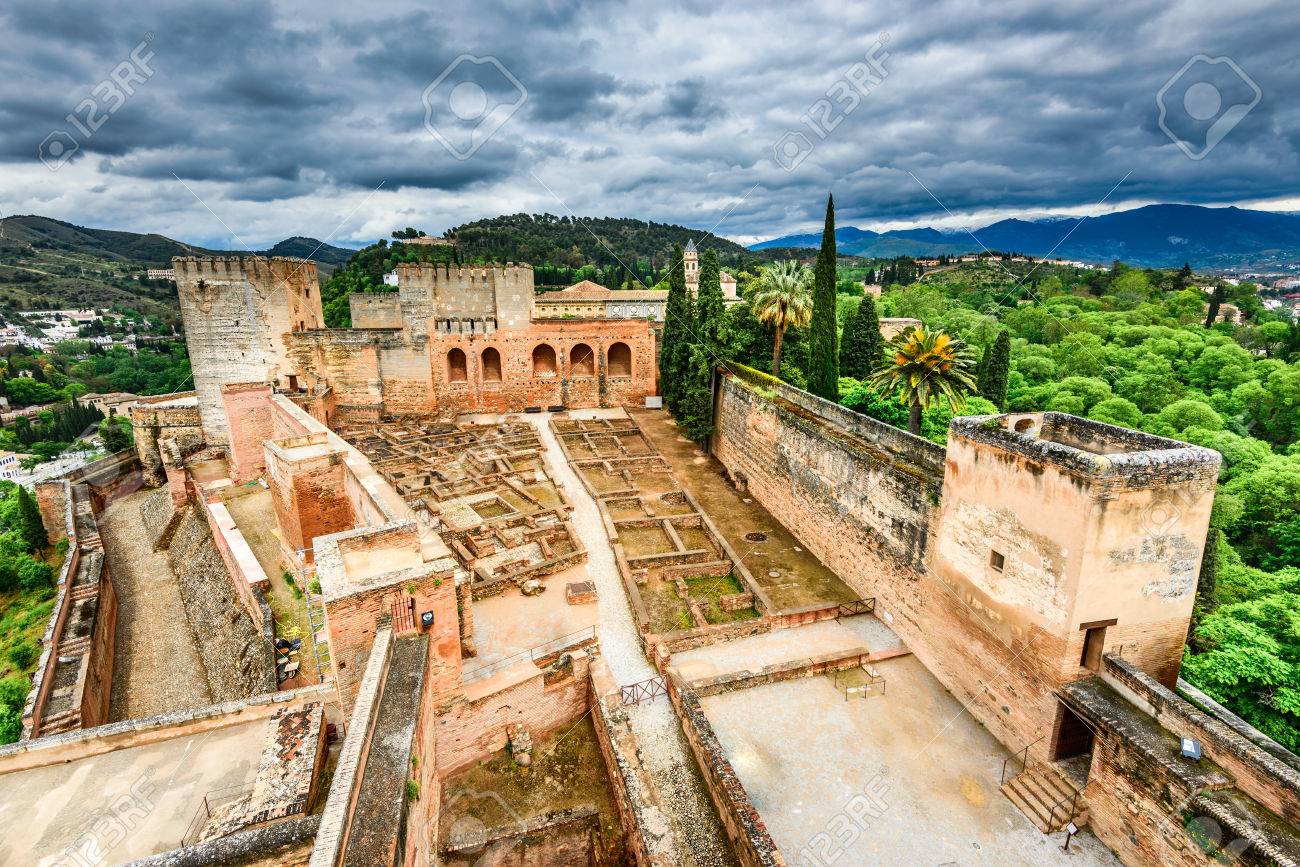
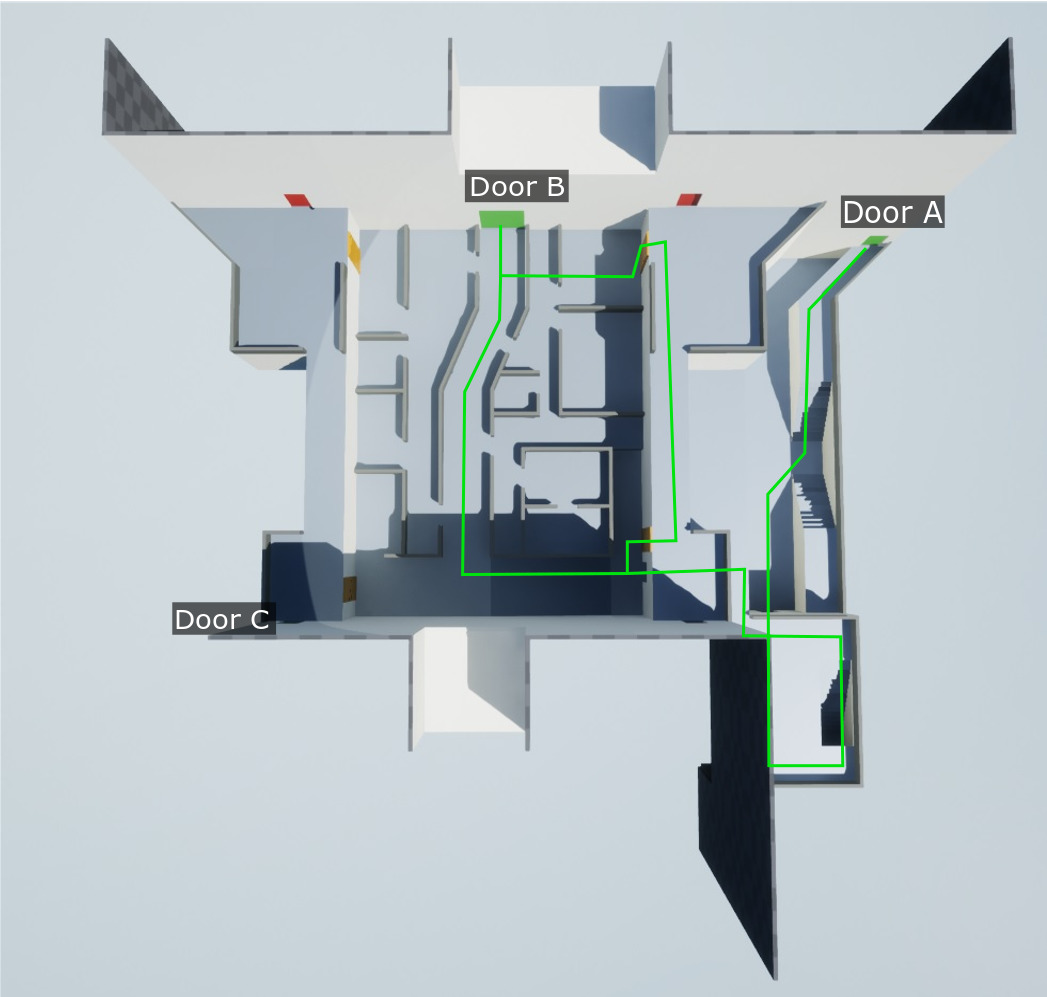
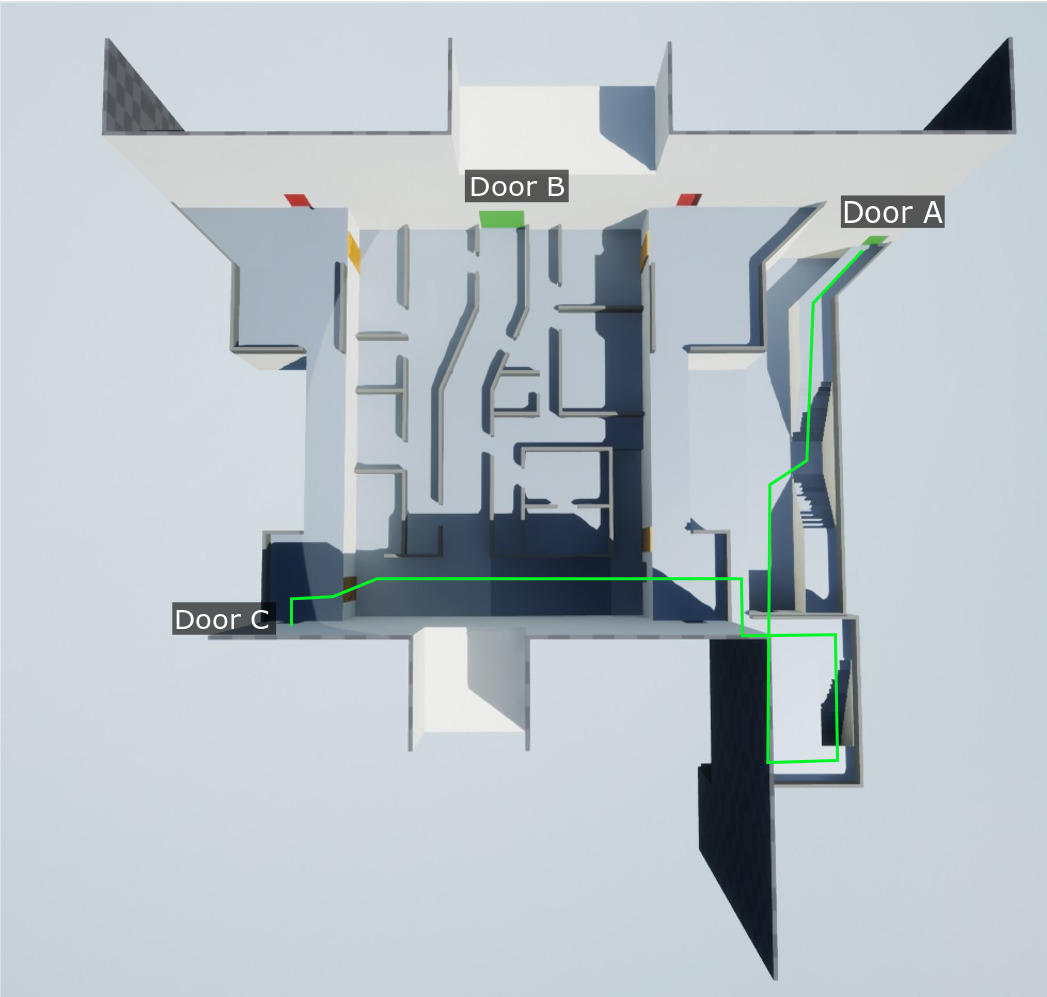
Layout Flow
As the player can start from any of the three doors, and end at any other door at random, I will indicate expected routes through each possible combination of doors.
Area Details
The following details the intended play experience for each area.
Lower Fortress Lower Wall
The Lower Wall takes the form of a series of narrow areas, which offer four levels of verticality. Given the positioning of the player, this can be leveraged to provide enemy encounters at multiple heights and angles in a tighter space.

Lower Fortress Lower Tower
The Lower Tower connects the Lower Walls Upper and Lower areas. This area is intended to serve as a break period in the sequence as well as provide loot.

Ruins
The Ruins are designed as an arena. In the center of a dense overlapping arrangement of crouch cover which can support long and short distance encounters. To complement and break stalemates are symmetric elevated walls, which provide both flanking opportunities and elevated positions overlooking the central area.

Lower Fortress Upper Wall
The Lower Fortress Upper Wall has views onto both the Lower Fortress and Upper Fortress, giving it the ability to serve gameplay setups in either area, as well as an alternate route to the B door. In addition, the shape of the area creates a chokepoint, which can be utilized by the player/enemies for interesting gameplay.

Upper Fortress Wall
The Upper Fortress Wall adds balance to the Upper Fortress layout with symmetry while also provides an alternate route. Like the Lower Fortress Upper Wall, the shape of the area creates a chokepoint which provides gameplay opportunities,

Walkthrough Sample
The following is a possible layout sequence for illustration purposes.
Intensity Graph
The numbers on the intensity graph correspond to beats.

Beat 1 – Lower Fortress
Key
- Green Humanoid = Player
- Red Humanoid = Enemy NPC
Beat 1.1 – Lower Wall
- The player starts at the Lower Fortress Wall. Ahead a number of guards.
- The player is given an indication to head deeper inside the fortress, and head to the Main Fortress Hall Entrance.
- The player begins attacking the guards.
Dev note: Three guards are clearly visible, positioned in a variety of heights to leverage the spaces verticality. One is placed further back to delay arrival in-order to limit the number of concurrent enemies to three.

Beat 1.2 – Lower Tower
- On defeating the guards, the player proceeds to the door of the Lower Tower.
- Upon entering the tower the player observes loot tucked away to the left. To the right is a staircase leading upwards.
- After grabbing the loot, the player proceeds upwards.
Dev note: The Lower Tower acts as a small break and reward point between combat encounters.

Beat 1.3 – Lower Wall Upper Area
- Arriving at the top of the staircase, it is clear the enemy forces are alerted to the players presence. Two guards appear and engage the player.
Dev note 1: The positioning of enemies are on two levels again to leverage the blockouts verticality.
Dev note 2: The area to the left (after the gate opening) is an exploration opportunity, which can be complemented with loot.

Beat 1.4 – Upper Fortress Gate
- As the player begins to proceed through the gate, an enemy runs around the opposite corner and begins firing through the small gate towards the player.
Dev note: This beat intends to add contrast to the type of engagements with a chokepoint combat fight.

Beat 2 – Upper Fortress
Beat 2.1 – Upper Fortress Post Gate
- Proceeding through the gate the player is presented with multiple ways to proceed to their objective, the Main Fortress Hall Entrance, which is the green door on the opposite side of the Ruins.
Dev note: There should be a momentary pause in attack to allow the player to first survey the new area and make a plan.

Beat 2.2 – Ruins Entrance
- Choosing to proceed up the ramp to the left, the player encounters three guards. One appears on the Upper Fortress Wall opposite the player. Two emerge from the quickly take cover in the Ruins.
Dev note: The overlapping and dense nature of the ruins allow the player to get close to enemies for a melee attack.

Beat 2.3 – Mid Ruin Fight
- After dispatching two of the three guards, the fight continues with an additional three enemies spawning in varied vertical locations.
Dev note: New enemies should spawn in such a manner to make the fight feel continuous, in order to reflect a final intense push before the end of the layout sequence.

Beat 2.4 – End
- Once all the enemies are cleared the player proceeds to the next area.

Iteration
With a first pass BSP blockout complete, the next phase is to continue iterating on the critical path through feedback from playtesting. I would iterate on the following gameplay aspects:
- Pacing – Does the layout feel too long? Are players feeling a buildup to the final fight?
- Balance – Are the encounters too easy? Too hard?
- Movement – The current layout doesn’t offer jumping opportunities. Would it be fun to add it? Where?
- Sightlines – Are flanking opportunities available? Is it difficult to engage with enemies?
- Cover – Is there not enough/too much?
- Non-critical paths – Are players using them? If they provide loot how is that affecting balance?
Additionally the visual design of the level should be iterated on in collaboration with an artist, in aspects such as:
- Composition – Considering our environment as experienced through a frame, are we using elements such as leading lines, and geometric scale to guide our players attention and aid storytelling?
- Storytelling – Where are there storytelling opportunities?
- Lighting – Are our lights drawing attention away from, and to the right places?
- Texture – Are our textures conveying valuable information or are distracting?
- Color – What languages can we develop color wise? E.g. yellow = climbable.
Fun Additional Mechanics
To complement the run and gun style gameplay I’m envisioning, I would add:
- Looting.
- A human shield system.
- Destructible environments e.g. cover.
- An A.I. buddy.
As an alternate line of fun I would add stealth as a viable approach with:
- Traps.
- Sneaking
- Stealth kills.
- Distract e.g. throw a rock.
Additional Level Ideas
Before
The previous level should work to build the narrative leading up to the Alcazaba layout. It should set the scene of Granda, and reveal the nefarious activity of Doctor UptoNoGood in the Alcazaba.
After
The level after should resolve the question of finding the clue. Nathan Drake encounters Doctor UptoNoGood and gets the clue. Then a chase sequence ensues as Nathan Drake tries to escape with clue in hand.